

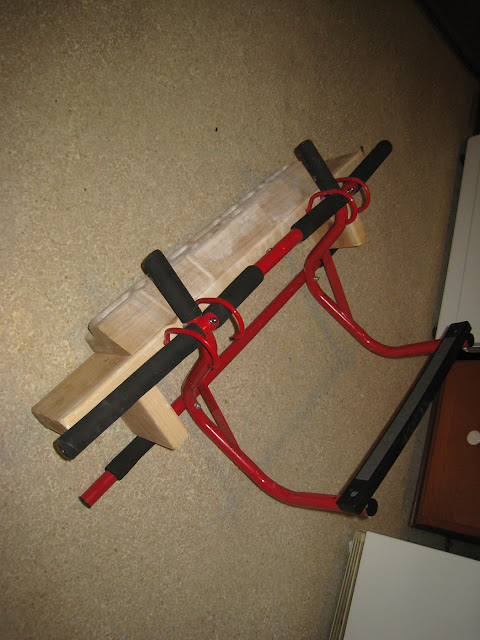
I'm a hangboard addict. Hangboarding for me was key to breaking into to hard climbing on granite and I use it to maintain some degree of finger strength and fitness when I can't climb on a regular basis and to build strengths needed for specific routes or problems... I would go nuts without my hangboard and I certainly wouldn't climb as hard. Jen and I recently moved into a new place where we can't drill into the walls so I derived a simple system for hanging my hangboard from a GoFit Elevated Chin Up Station
I'm quite happy with the results. The chin up bar itself is great for warming up, doing various lock off and chin up drills and practicing leg lifts and front levers. The hang board mount has a bit more flex then a proper wall mount but it is nice to be able to move it from door to door and take it down and put it away.
I think this would be a great system for collage students, people in dorms, apartments or shared housing, roadtripers who stay in hotels or people who travel for work.

What you will need to make it:
- GoFit Elevated Chin Up Station
- A hangboard and mounting screws of your choice. I'll write another post on this later but my choice would be either the Beastmaker or a single metolius campus rung.
- 4 bike storage hooks. You can get these from your local hardware store or on amazon.
- A 6 foot 2x6, 2x8 or 2x10 board depending on the height of your hangboard.
- 6 3 1/2" wood screws.
- A drill, screw driver and saw and possibly a level.
- Coarse (~80-grit) sand paper.
- Some felt like you put on the bottom of furniture to protect hardwood floors if you wish to avoid damaging your door frame.
To build your hangboard mount (note: these instructions assume your hangboard is not as wide as your door frame, if it is you will need to mount the horizontal supports described in the optional steps before you mount the hangboard):

- Install the GoFit on your door frame.
- Cut a length of board wider then your door frame. Set the rest of the board aside for use as horizontal supports. Sand the exposed edges and corners.
- Mount the hangboard in the center of the board being careful to keep it parallel with the top and bottom of the board.
- Determine where you need to place the hooks so that they will sit evenly on either side of the support bars of the GoFit (it is easiest to have some one help by holding the hangboard against the door frame). Mark the four spots with an X and drill piolet holes for the hooks. You should use a bit smaller then the threads on the hook, about the size of the center cylinder of the hook or slightly smaller.
- Install the hooks and verify that the board hangs correctly from the lower bar. You can make small adjustments by bending the hooks.
- Install some felt on the back of the board where it contacts the door frame.
At this point you have a functional hangboard that hangs a bit low. Depending on the height of the door frame you may wish to add a couple of horizontal supports to allow you to hang the board from the upper bar without it swinging.
To do this follow these steps:

To do this follow these steps:
- Hang the assembly from the upper bar.
- Hold the board so that it hangs vertically. You will need to use a level or a plumb line for this. If you don't have either you can use a piece of string with a weight on the bottom hold the board so that it just touches the string along its whole height.
- Carefully measure the distance from the back of the board to the lower bar of the go fit and note this distance.
- Cut two sections of board to this length.
- Using the six wood screws install these pieces on either side of the hangboard making sure they can fit through the door frame when the assembly is hung from the lower bar. If your hangboard is wider then your door frame you will need to mount the boards behind it so either remove it or do these optional steps first as I mentioned above.
- Sand the exposed corners and edges.
That's it, enjoy your new hangboard but don't overdo it. When I started hangboarding I would restrict my self to one good session a week and that was plenty to develop the strength to power through index 5.11's and v5 bolder problems. Make sure to always warm up on the pull up bar and on easy grips. Don't fall into the trap of doing a pull up off bad holds every time you walk by the thing, you will get hurt. If your fingers feel at all tweaked take some time off.