Friday, November 11, 2011

Hillmap Gets A Major Update

I just went live with a major update I've been working on for a while which includes a new look and feel and some very cool new features. There is a bunch of new stuff but the major features are:

  • A new tab and window based ui designed to give me room for more tools and save screen space for what matters most (the maps).
  • Integration of data from SNOTEL sites across the western US.
  • Ability to load data from the daily National Snow Analyses done by the National Weather Service/National Operational Hydrologic Remote Sensing Center.

This last feature is what I am most excited about. It is not the highest resolution data and can bog down the browser but it provides a great look at a number of aspects of the snow pack allowing you to get an idea of the snowpack history for anywhere in the country. You can literally check where the powder has been falling in the cascades in a few glances for example.

Check it out on the new data tab and let me know what you think!


Friday, November 4, 2011

Map Scale on Topo Prints and New Search Feature

Olympic Ski Touring
Winter is Coming

I've just added distance scale, bound information and an up to date magnetic declination estimate to the topo maps printed through hillmap. I've also added a tool showing estimated spacing of 200ft contour lines produced by a 30° slope to aid in route evaluation in the field. This should work with the major contours on most topo maps, let me know if you would find other spacings better.


I've also updated the search feature on the main page so that it will autocomplete with places names. It is biased to find place names year you so you can use it to locate landmarks along a potential tour while trip planing.


Thursday, November 3, 2011

About Hillmap and How to Use It


Hillmap: Find a new line (or learn more about your favorite trail)

Hillmap.com is a free and powerful mapping website that allows you to create & print high-quality topo maps, share your maps and trails with your trip partners, calculate slope, check the weather & snowpack and upload & dowload gpx files among other tools.  The basic tools are described below.

Hillmap seeks to combine as much map data as possible in one place and to provide tools of interest to skiers, hikers, climbers and other backcountry travelers that make it easier, faster and more fun to plan new backcountry trips.

Getting started with hillmap

The hillmap webpage opens with a split screen of two maps, and a header that opens up a variety of tools you can use to customize a map, analyze terrain and derive more information about your trip.

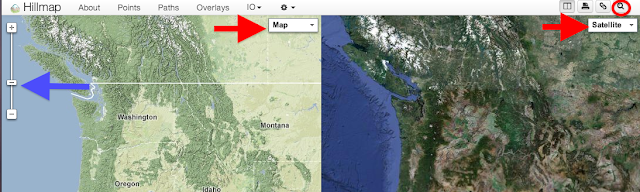
Red circle: Search button
Red arrows: Drop down menues to pick different map layers
Blue arrow: Zoom

Begin to customize your map by finding a starting location.  You can either use the search tool in the upper right hand corner, or zoom in on your starting location.

When you've found the starting location, choose your map layer (described in detail below) from the drop down list.

At this point, you can print your map, check the weather, share a link or plot a path.

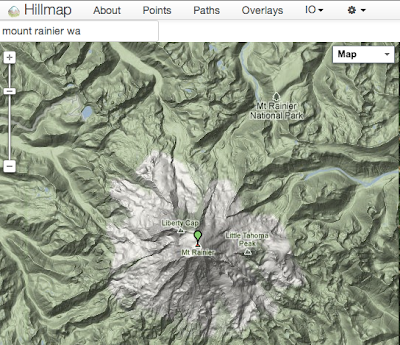
Starting to zoom in on Mount Rainier

Hillmap Tools

Hillmap's most useful functions are located in the different tabs at the top of the page: Points, Paths, Overlays, IO and Settings.  The tools under each tab let you explore your map in more depth.

Points

Click anywhere on the map for more data at that point.  See latitude, longitude, slope, elevation and a link to the weather forecast at that point.
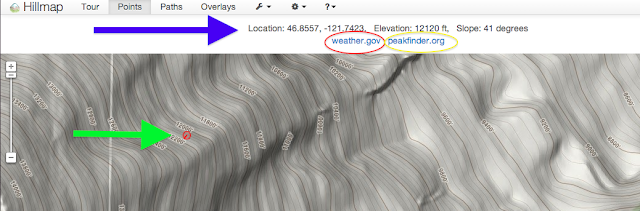
Points tab
Blue arrow: Longitude, latitude, elevation and slope at your point
Green arrow: The point, line in the point circle points in the steepest direction
Red circle: Link to weather forecast at your point
Yellow circle: Link to peakfinder to name peaks near your point

Paths

Build a path on the map by clicking on screen.  You can share a link to your path, print a map, or export the route to your gps.  You can also check the path profile for the elevation changes of your path; this feature is also useful for checking the line of sight.
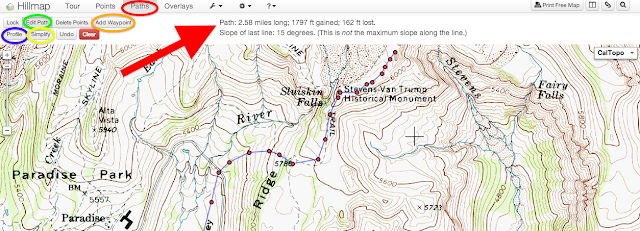
Paths Tab Screen
Red Arrow: The length, elevation gain and slope of the last segment (the purple path between two red points making up your path) appear at the top of the screen
Green circle: Edit path button allows you to add points to your path
Blue circle: Profile button will show you a graph of the elevation changes on your route
Yellow circle: Simplify your path (especially useful for GPX files) to reduce the number of points on your path
Orange circle: Add a waypoint, a note at a particular point on the map
Red circle: Path tab

IO or Overlays

The Input Output (IO) tab is renamed Overlay in the beta version of hillmap.  The IO tab is the power center of hillmap with different map analysis tools.  You can overlay different map layers to drill down and look at slope, snowpack, weather radar and tree coverage from the satellite view.
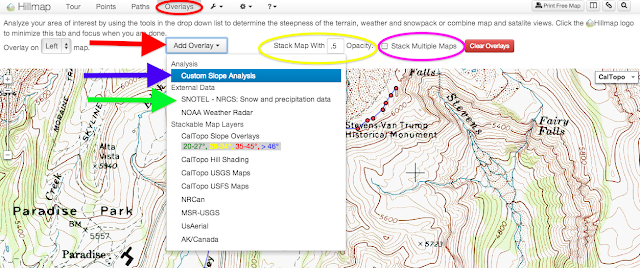
Overlays Tab
Red arrow: Drop down menu for different map layers
Blue arrow: Hillmap custom slope analysis layer
Green arrow: Snotel layer will give you snowpack and precipitation data for NOAA points
Yellow circle: You can make the map layers more opaque or transparent
Pink circle: Check this box to stack more than one layer at a time
Check out the other map layers on the drop down list

Print and Share

Customize your map by zooming in on your area of interest.  Pick the map layer that reveals the detail most useful for your trip.  Create a  link to share with your trip buddies or to save the map & route. Print your map for free and have a great trip!

Tools on the top right of the screen
Red rectangle: Button to print a free map - see more instructions here
Green square: Split screen button - click to switch between one or two maps on the screen
Orange square: Get a url to share your map
Blue square: Search button, click to open up the search tool to search by peak name, address, latitude/longitude
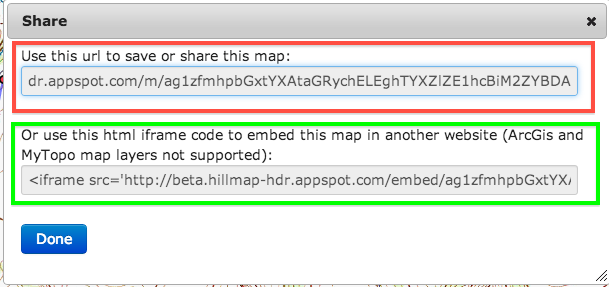

Share url screen
Red rectangle: copy the entire url to share - highlight the long url to copy (don't be scared by the "can't change the url address symbol")
Green rectangle: copy the html code to embed the map in another website or your blog

You may only use hillmap.com if you agree to the statement below

Self reliance is an essential feature of backcountry travel. Much of the map data
available here and elsewhere is out of date, of low resolution or just plain wrong.
Gather as much data as possible before you enter the backcountry but be prepared
to revise your plans if conditions and terrain you encounter do not match what you
are prepared for. Seek education from a qualified instructor before entering avalanche
terrain.

Hillmap is released free of charge as beta software in the hope that it will be
useful, but without any warranty; without even the implied warranty of merchantability
or fitness for a particular purpose.

Contact

If you have any questions, comments, criticisms, requests or bug reports please
contact us at contact@hillmap.com.

Wednesday, August 10, 2011

Cougar Rock: Who Wants to Climb Some First Ascents?


july 2010 explorations-105
The View from the parking spot...approach involves only10-15 minutes of hiking.


Two years ago Jen and I found a cool hilltop rock at around 6000 feet on the east side of the North Cascades. It is composed of weathered old granitic rock somewhere between washington pass and joshua tree in quality  with a number of intruding dykes, cracks and wind sculpted huecos forming steep and interesting climbable features. We've been back a few times and established a handful of fun boulder problem and one okay roped routes which lacks anchors as the short hardware store wedge bolts we had with us were sketch in the weathered rock. 

Atypically for Washington, the rock is quite clean. Everything we've done so far has been ground up though the steepness of some of the lines may convince us to hang a rope down them.

late_summer_early_fall-237
View from above.


The climbable season for the rock is somewhat short due to its elevation but it also provides an escape from both the rain of the west and the heat of the lowlands making it the perfect destination 1-2 weekends a year. The 360 degree views and wildness of the spot also make it rather unique.

late_summer_early_fall-218
Jen working "Spine Tingler" a cool dyke that arcs through an overhang. Currently you finish by stepping across to the tree but I would like to eventually top it out on aliens in pockets or bolts...it should make a decent length pitch.

We have had it to ourselves for a couple of years and have not even touched a number of the quality lines. It seems the best course forward is to invite our friends out for a first ascent weekend sometime soon so that they can also share in the bounty...let us know if you are interested. 

Logistically the crag is 4.5 hours from seattle, about n hour of that on a dirt forest service road that was cleared and graded recently and should still be passable to honda accords and similar. It is well outside of the wilderness area (as demonstrated by the dirt and mountain bike trails in the area). Reports from mountain bikers in the area suggest the snow has melted but this year who knows. You can camp at the parking area though there are no amenities and it is on the way to nowhere ...bring your own water, plenty of gas, spare tire etc and be prepared to dig a pit to poo. The nearest developed camping (and swimming and climbing not developed by us) is about an hour away due to the winding dirt road. After our experience with short wedge bolts we are convinced all fixed anchors should be long stainless rawl five pieces or similar and I bought a number of these.

There are many other undeveloped crags and boulders and some larger walls in the area waiting to be scouted...four wheel drive and or mountain bikes could be useful. 


july 2010 explorations-116
The short approach. A sweet looking steep crack splits the overhanging headwall of the left spire...we haven't tried it yet as we got distracted by all the cool dykes and huecos close to the ground.

july 2010 explorations-126
The crack from below that hides the steepness of it.

july 2010 explorations-174
And another from the side...with the slaby crack below this will make a really cool hard single pitch crack route to an independent summit. 


july 2010 explorations-167
The saddle between the two spires.

july 2010 explorations-146
The one roped rout to date. 

july 2010 explorations-137
Overview of that wall, note the abundant intruding dyke features.

july 2010 explorations-127
A steep, featured, wall.

july 2010 explorations-131
"Spine Tingler" on the right end of the steep wall.

july 2010 explorations-117
The strange "paw" feature.

july 2010 explorations-162
Slaby wall awaiting first ascents.

july 2010 explorations-165
This slab could have an awesome tip toe route on some small features...click and select the larger size for full effect.

july 2010 explorations-164
Unclimbed flake to a Hueco covered roof. 

july 2010 explorations-160
Some cracks.


july 2010 explorations-184
Telephoto shot from far below showing small boulder field.

late_summer_early_fall-185
Jen on the FA of The "Sand Ladder" warm up boulder. 

late_summer_early_fall-193
Another. 

late_summer_early_fall-198
The "Huecos are for Lovers" alcove.


late_summer_early_fall-276
"Flakes are for Fun Lovers" to the right of huecos, finish left and up, right finish remains to be done.

late_summer_early_fall-259
One of the Hueco problems in the alcove... finish by stepping off to a large boulder at your back.


late_summer_early_fall-251
Flakes and cracks in the saddle.

july 2010 explorations-113
Cougar prints we found around our tent one morning...it is a wild place.

Saturday, July 30, 2011

Review Ratting System

Honeymoon Leg 3 Lost Horse and Blodget-75
Testing Approach Gear in Blodget Creek


My wonderful wife Jen (a strong and well rounded mountain person in her own right) and I have decided to revive this blog. One of the new goals on this blog will be to provide recommendations of gear that actually works. Too many gear reviews in industry sponsored publications amount "these shoes don't perform well but are great for easy routes." We hold our own selection of gear to a higher standard...I don't want another pair of shoes that makes it impossible to do the "11a" slab move on thin fingers.

To this end, reviews on this blog will use a closed but relative rating system inspired by John Gill's  B system for rating boulder problems in terms of what is currently possible. The B system is elegantly simple, a B1 represents a problem as hard as anything done on a rope, a B2 problem is harder and a B3 problem is a problem so hard it has only been done once.

Inspired by this we assign the following ratings:

G0: Gear that is to be avoided. Gear in this category either fails to perform at a reasonable level or has a serious design flaw. It will actively hinder your performance or endanger your life.

G1: Gear that performs at an average or mediocre level. Gear in this category can be used to good effect and it may have redeeming qualities such as comfort, availability or price but buying it will not help your performance and is probably nor worth stuffing in your pack for a day cragging at Index. La Sportiva Mythos fit in this category until someone shows me how to stand on tiny edges in them.

G2: Gear that performs as well as any currently available gear. This is the gear you should be using if you wish to push your level of performance. La Sportiva Miura's and Five Ten Anasazi fit in this category...the shoes you see on the hardest routes in the world and on local hardpeople.


Honeymoon Leg 2 100 Degrees in Blodget Canyon-17
Thin slab climbing requires good, if not great, shoes.


G3: Gear that sets a new level of performance. This rating is reserved for those rare pieces of gear that redefine what is possible instead of refining existing designs. Don't expect to see this rating too often but Wild Country Friends (the original spring loaded caming devices) would have received this rating when released as would the original release of sticky rubber climbing shoes.


Ratings may also include a + or - indicating that the piece of gear has a unique feature that adds or subtracts from its value. For example the original forged friend design, though R3 at release, would now rate as R2- since the forged stem requires extra care when, black diamond Camelot C4's would rate at  R2+ since their double stem design provides extended range. OP Link Cam's rate R0+ indicating I won't climb on them and feel they shouldn't be sold due to a failure mode that has caused several accidents but they do provided a large level of expansion range if you are willing to accept those risks.

This system is of course subjective and uninformative as all such systems must be. The individual reviews will seek to hold an analytical eye to the fit, strengths and weaknesses of each piece of gear.


Honeymoon Leg 3 Lost Horse and Blodget-70
Good approach shoes are needed to avoid the buschwack getting down from Blackfoot Dome, MT.