Tuesday, April 30, 2013

Waves of Spring


Spring in Montana is an actual season.  If you're from here, that may not seem like a revelation, but if you're from elsewhere you might not believe that Spring can be more than an ephemeral concept.  

This year Spring has lapped up over the Bitterroot Valley in waves: big, warmish Spring snow storms, the melt-freeze cycle, the appearance of glacier lilies in sunny, protected spots in the forest, songbirds, many warm days. Every few days for the past month or so Spring has washed something new to my doorstep.


I woke up this morning to the sun streaming in my window and a profusion of bird song (and my cat, who has adamantly decided that sunrise is breakfast time).  I took myself out for a walk even before coffee to see what I could see.  I tried my darndest to take a photo of the birds flitting through the sagebrush, but only the robin stayed still long enough for a portrait.


A few of the plants have decided that Spring is firmly enough entrenched to send out new growth.  One or two of the Cottonwood trees have tiny new leaves.  The mock orange (pictured above) is the most precocious of the flowering shrubs.


Water in the "Big Ditch", the main artery of the Bitterroot Irrigation District, is the true signifier of Spring in the Valley for its human population.  The ditch carries water from the enormous Lake Como for 72 miles through the dry East side.  Now that there is water, the fields have started to come alive.


The sound of sprinklers running on water from the ditch is the new normal.  Last night the temperature dipped below freezing and the trees and fence line were covered with sprinkler icicles.  My environmentalist self balks at the water shooting out across fields and lawns, many which will not grow food - but I'm told that live, green grass helps prevent fires from spreading later in the season.  It also keeps noxious weeds (the kind that are bad for horses and other livestock) from outcompeting the nutritious grass species.


Waves of Spring will continue through all of the micro climates at different elevations and aspects until the snow falls again in autumn.  I'll be out walking through Spring flowers in August somewhere up high.

Thursday, April 25, 2013

Mapping the Epigenetic Landscape

Screen shot from the Transcriptional Regulation and Epigenetic Landscape Explorer's Topographic Landscape tool showing a landscape inferred from publicly available gene expresion data for human cell types. 
As reader's of this blog may or may not know, I lead a dual life as an outdoor person/hillmap maintainer and a software engineer/data scientists focused on biological research. Links between the code behind hillmap and the code I write in my day job  are rare and usually too technical to be interesting to non coders but recently I had the chance to help with a tool that used topographic maps of abstract landscapes to visualize the results of some cutting edge biological research.

Lead by Merja Heinaniemi scientists from the Institute for Systems Biology where I work and groups from Finland and Luxembourg collaborated to infer an "epigenetic landscape" from a curated set of publicly available gene expresion data for human cell types (Heinaniemi, Merja. et all "Gene-pair expression signatures reveal lineage control"Nature Methodspress release).

Waddington's now classic depiction of the epigenetic landscape of dividing valleys/cell types which an embryonic cell may procede into first appeared in his 1957 book The Strategy of the Genes.
Conrad Hal Waddington proposed the concept of the epigenetic landscape in the 1950's as a metaphor for the way in wich a stem cell, like a marble rolling down a slope, can develop into any number of cell types (valleys) in the metaphor but cannot hop between cell types or return up the hill to its original state with out some significant perturbation.

Waddington illustrated his metaphor with beautiful pen and ink drawings like the one above. I won't attempt to describe the details of the analysis done to infer the landscape as I did not contribute to it, but I did help produce a grey scale topographic map of the results inspired by Waddington's drawings which you can see in the top picture and the one below or in an interactive map viewer under the "Tools->Topographic Landscape" menu item at the paper's companion webapp the Transcriptional Regulation and Epigenetic Landscape Explorer.

As fetal cells develop they progress down the valley to the left of this screen shot of the inferred landscape.
The care that went into Waddington's illustrations has always reminded me of classic USGS topographic maps. The metaphor of a landscape is not perfect; Waddington's valleys split as the marble procedes downhill while real world valleys tend to come together as alpine streams which then join to form major rivers. However, a landscape akin to Waddington's does apear near the peaks of high mountains where streams and vallies shoot off in all directions away from the summit before recombining at lower elevations.

The furcating valleys down which a skier perched on the crater rim of Mount Saint Helens may proceed down. (View in hillmap)
The south slopes of Mount Saint Helens are particularly akin to Waddigton's concept. Rocky ridges and ash deposites from the 1980 eruption have beem sculpted by erosive forces into serpentine ridges and valleys. I skied the most popular winter route last year, "The Worm Flows" which is named after these features and bears a striking resemblance to Waddington's drawings.


Perched on a the summit, a skier or climber has the potential to choose a line reaching any number of places. As with Waddington's marble dropping down into the wrong valley, as we have all done at one time or another, will leave him in a position where a great deal of energy is required to return to the desired location (usually the car).

A rugged portion of the inferred landscape I attempted to color with the USGS pallet. I imagine these basins as holding high alpine lakes though they represent abstract sets of similar cell types.
The high tarns above Chaffin Lake in the Bitterroots occupy a similar landscape. (View in Hillmap)
This was also my first attempt at actually making map layers. A long term goal of hillmap is to include some custom topographic map layers and this was a step down that road (or valley) in terms of learning the software required.


The view from the summit of Mount Saint Helens as my ski partners find their line through the landscape.

Tuesday, April 23, 2013

Dungeness Spit


Dungeness Spit is a remarkable strip of land jutting North into the Strait of Juan de Fuca off the Olympic Peninsula.


The trail extends five miles out the narrow beach through the Wildlife Refuge.  You're surrounded by the ocean and waves, staring North toward Vancouver Island which you can squint to make out in the distance.  South of you loom the Olympic Mountains.


The feeling I get walking out the spit is of vastness: vast in a way that craggy mountains or wide open plains can never feel.  I feel like I'm on the edge of the world.

This is an awesome hike for shoulder season.  While spring weather may roll in and you get a bit damp, the cloud play over the mountains and waves makes it worth it.  Hike out all the way to the lighthouse, or just go as far as you want and turn around - you get stunning views no matter how far you go.


Ryan and I ended up on this hike after driving out to Hurricane Ridge to ski and being turned back due to road closure.  Hiking out the Dungeness Spit is a great alternative to Hurricane Ridge, located just outside of Sequim, WA and not far out of your way to the drive to the ferry.  It's also a worthy destination in and of itself especially for bird watchers, beach combers or if you are just looking for an intriguing walk on the beach.

Good thing Ryan has his Avalung Backpack! (yes, very funny)


Thursday, April 18, 2013

Hillmapping Wildlife Crossings in Mongolia

Photo courtesy of the Montana Department of Transportation. Click here for more wildlife crossing photos.

Last week the Billings Gazette carried the story, Mongolian Officials Look to Montana Wildlife Crossings as Model. Wildlife crossings are usually bridges, culverts or underpasses that allow wild animals to cross busy highways without tangling with oncoming cars.  Good for the animals and good for drivers.

Apparently, the Trust for Mutual Understanding is funding a project to be proactive about protecting critical wildlife habitat in Mongolia's Oyu Tolgoi, an area that is quickly developing due to an enormous and expanding copper mine.

I had no idea where Oyu Tolgoi was, vaguely knew it was in/near the Gobi Desert, so I plotted it in hillmap.


Oyu Tolgoi is in South Eastern Mongolia, in a sparsely populated region.  On the map you can see how few roads cross the terrain.  If you zoom in even farther, you can see the rock outcroppings and sandy or rocky surface.

Many rare and some endangered species live in this region.  Preserving habitat is not necessarily enough to protect wildlife: areas of habitat need to be connected so that animals can roam to areas of connected habitat to find food, water and safe places to live and breed.  Acting now, as the Oyu Tolgoi region develops, could help preserve the connectivity of habitat to reduce the impact of mining and development on wildlife.

Montana has been on the forefront of implementing wildlife crossings on Highway 93 to protect bears, deer, motorists, and other animals.  According to the Montana Department of Transportation, Highway 93 has the "most extensive wildlife-sensitive highway design...in North America," with over 76 miles of reconstructed road.


If you take a look at the Bitterroot Valley in the map above, you can see why this area is ideal for testing wildlife crossings: two mountain ranges (one of them in the gigantic Selway-Bitterroot wilderness area) are separated by a rural valley cut in half by a 4+ lane highway.  Not too different from the vast areas near Oyu Tolgoi that are split by large roads.  

Preliminary results of the wildlife crossing experiment are available for the Northern section of 93 from Evaro to Polson, MT.  One interesting finding is that more animals used the wildlife crossings to cross 93 in that area than crossed the highway in that area before the crossings were built.  The MDT counted 8,555 deer and 259 black bear used the crossings in 2011-2012, however, only about 1,732 deer and 109 black bear crossed the highway per year in that area prior to construction.  Very interesting.  

In true Montana spirit, so the story goes, a bull moose was the first to use the Evaro overpass.
I think this is a satellite view of the Evaro overpass.

Monday, April 15, 2013

Trail Miles


After a week of summer like weather, shoulder season has firmly arrived. The days have been filled with short, snowy squalls mixed with warm sun breaks and gusts of bitter cold wind. These conditions aren't ideal for skiing or climbing so we've taken to the melted out trails logging miles in our running shoes.


I haven't been a serious runner since high school and even the canyon bottom trails in the Bitterroots climb steeply. I find myself sucking for air frequently. We stop to walk or scramble the steepest bits and then remind ourselves to keep striding along. As the miles add up I can feel the fitness returning and anticipation building for summer romps.


Windshirts (ours are Patagonia Houdinis) have proven indispensable in these early season conditions. They are breathable enough to run in yet protective enough to shelter us from the blowing snow. Wearing one over a base layer I can be comfortable running along at full speed or stopped for a few minutes.

Up Sawtooth Creek we found Cedars in the cool shade along the canyon bottom. Are we in western Washington? 
I could feel the call of this featured steep bit of stone in a frozen meadow up Sweathouse creek. I plan to haul rock shoes and a crash pad up the two mile approach on one of the next sunny days.

The same boulder on a warm day last summer along a burbling creek surrounded by wildflowers.

Thursday, April 11, 2013

Three ways to look at the slope of terrain in Hillmap


Hillmap features a suite of tools you can use to measure and visualize slope on topo maps.  We use these tools to help us find the best line to ski, scout for cliffs (especially when we know there is climbable granite in the area), choose a likely camping spot, and check out trails before we hike them.


Slope at a single point

The most basic tool for measuring slope is the Point tool.  Place the point on the map, and the slope will appear at the top of the screen on the Points tab.

Red circle: Points tab
Blue circle: The slope of your point printed at the top of the screen
Red arrow points to the point that is measured

Step 1: Navigate to the Points tab.

Step 2: Place the point where you want to measure slope.  If you zoom in, the red point on the map looks like a circle, with the radius line pointing in the steepest direction.

Step 3: Look at the top of the screen for information about the point, including slope.


Hillmap Slope Tool

The Hillmap slope tool creates a layer for your topo map that highlights slopes of a certain steepness.  The angle is customizable, but defaults to highlight slopes that are greater than or equal to 30 degrees.

A hillmap slope layer looks like this:


The red shading on the map are the areas that have a 30 degree slope or greater.  All of the other areas on the map have a slope of less than 30 degrees.  I used this map as one tool in plotting a route that minimized avalanche danger.

Step 1: Navigate to the Overlays tab

Step 2: Selecte the Data Overlays drop down menu and then select Custom Slope Analysis.

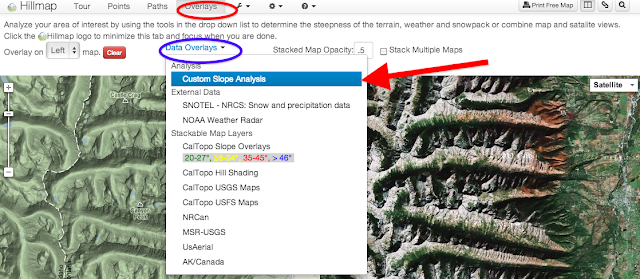
Red circle: Overlays tab
Blue circle: Data Overlays drop down menu
Red arrow: Custom Slope Analysis 
Step 3:  Customize your slope.  You can leave the slope default at 30 degrees, or you can change the angle.  For example, if you want to plan a flatish hike, you can choose a 12 degree slope, or if you are searching for couloirs to ski, you can choose a 45 degree slope.  Either way, the layer that wil appear on your map will be greater than or equal to the slope you type in the dialogue box.


Step 4: Hit the Analyze on Screen Area button.  Hillmap will run the algorithm (it may take a moment) and then the slope layer will be overlayed on your map.  This feature works best if you are zoomed in on a particular area about 10 miles on a side, and then zoom in further to see greater detail on the map.  If you are too far zoomed out, the function does not work.
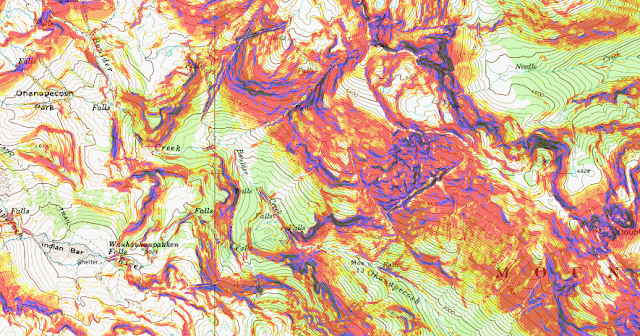
Caltopo Slope Layer

Caltopo map layers are created by  Matt Jacobs, who began this project to create better maps for Search and Rescue in California, and now has coverage for the entire US.  The Caltopo Slope Layer automatically highlights slopes in seven different categories: slopes from 27 to 29 degrees, slopes from 30 to 31 degrees, slopes from 32 to 34 degrees, from 35 to 45 degrees, from 46 to 50 degrees, from 51 to 59 degrees, from 51 to 59 degrees and greater than 60 degrees.

The map layer looks like this:

The key to the slope layers is in the Add Overlays drop down box on the Overlays tab


Step 1:  Navigate to Overlays Tab

Step 2: Click on the Layers drop down box and select Caltopo Slope.  You may have to wait a moment for the map layer to load, but it will do this automatically.

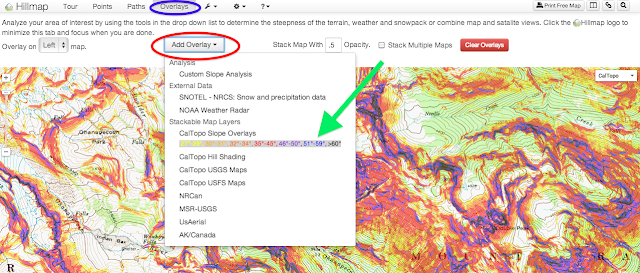
Red oval: Add Overlays dropdown menu
Blue oval: Overlays tab
Green arrow: Caltopo Slope overlay selection and key

Slope Analysis in Action

I use the slope tools all the time.  Right now Ryan and I are thinking about buying a house, and I shamelessly use the point tool to check out how steep driveways are.  I have used the tool heavily over the winter to find ski lines that are exciting but minimize avalanche danger (hillmap slope tools are not a substitute for safe avalanche practices and there is no warranty that using hillmap will keep you safe).  I'd love to hear how other people use this tool!

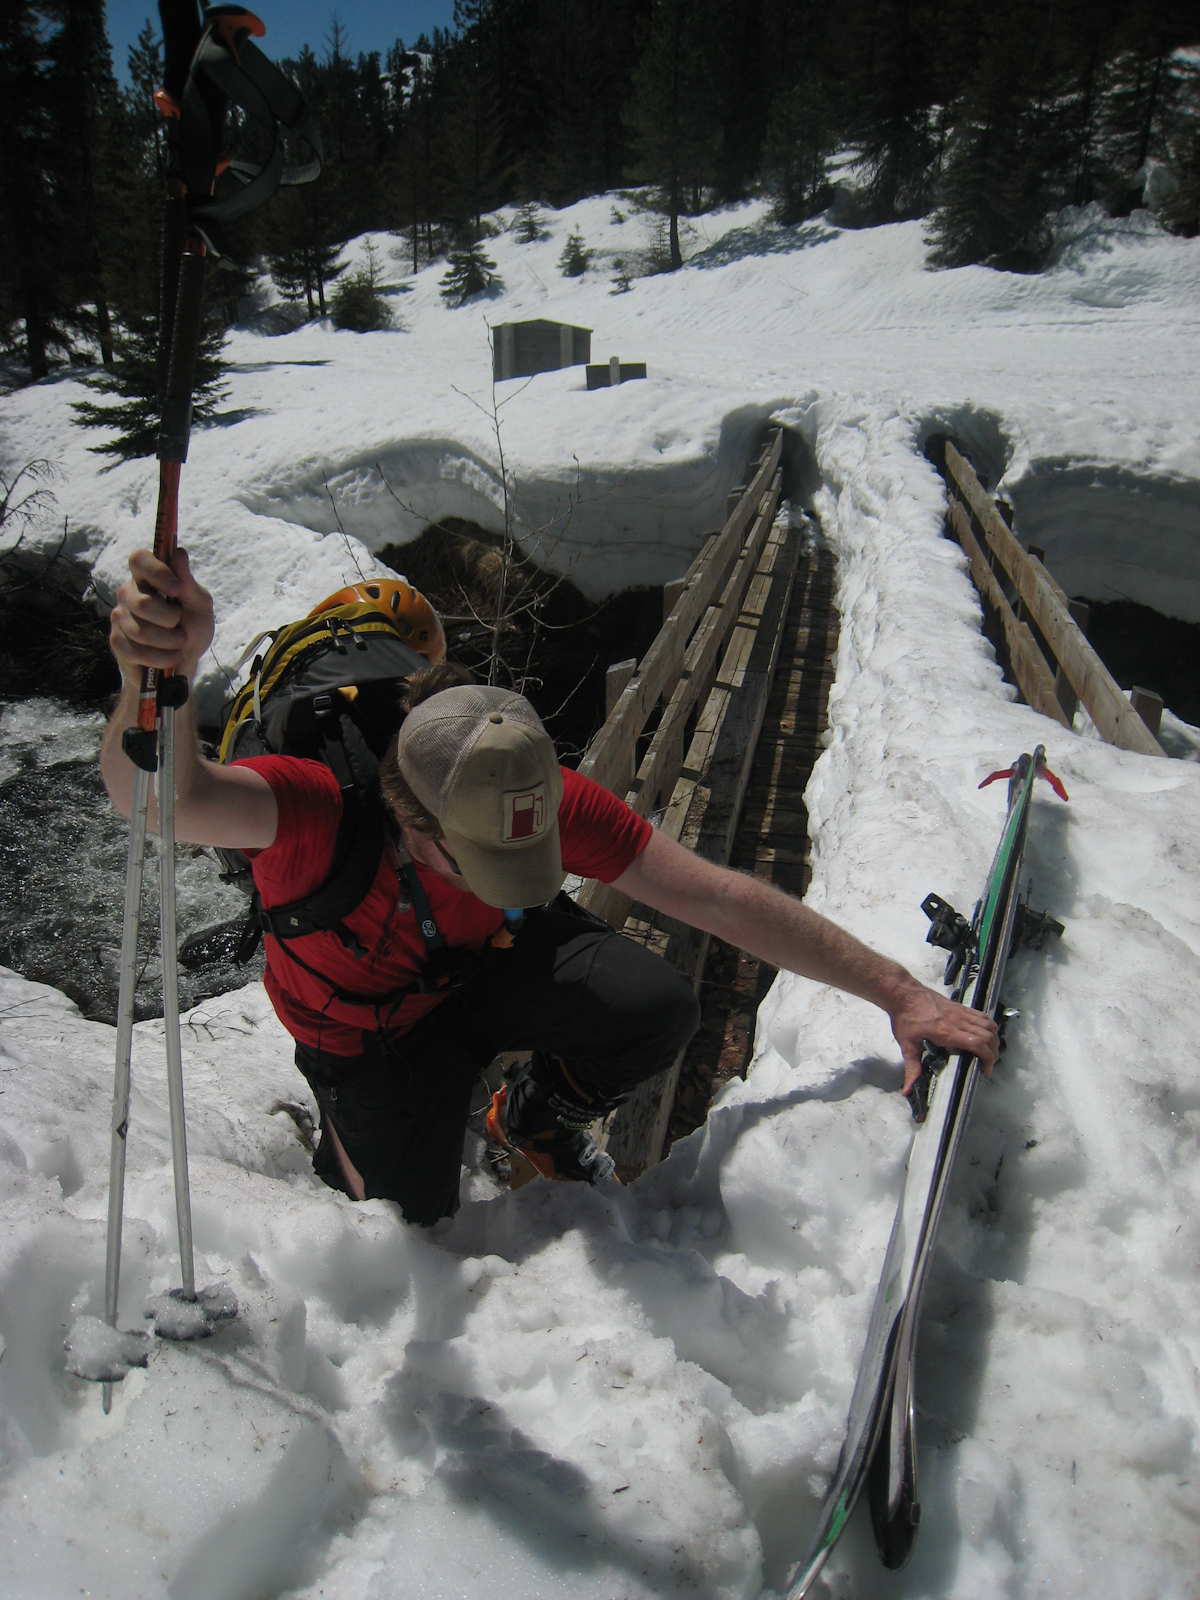
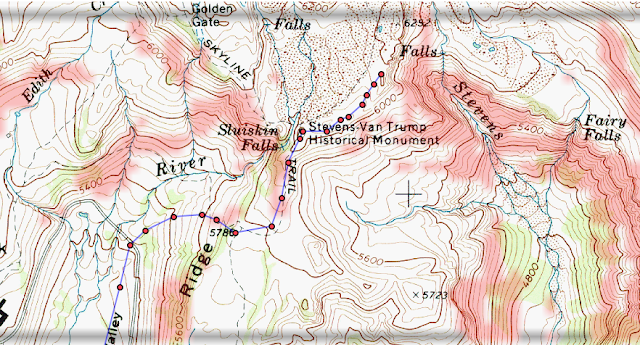
Here's a photo taken on our traverse of Mazama Ridge on Mount Rainier.  The map used in this blog post is of that traverse.


Click on the View in Hillmap link on the map below to play around with the slope tools for the Mazama Ridge area.  The photo was taken facing Mount Rainier from about the 5786 elevation notation on the map (we were probably standing somewhere near where the 7 or 8 appears).  Take a look at the left side of the photo, of the scraped out avalanching cliffs: this is the steep area just about where the 5400 notation is on the map.  If you use the slope analysis tools in hillmap you will see that the slope is indeed greater than 30 degrees.


Monday, April 8, 2013

Black Diamond Carbon Justice Backcountry Ski Review


I'm perched on a bit of icy sastrugi at the crater rim of Mount Saint Helens. 4000 feet of variable sun warmed slop doted with chunks of ice open up beneath me. I drop in, straight line through the sastrugi and make a few quick turns to get the feel for the snow and then begin arcing big turns, confident that my skis will skim over the heavy wet snow and punch through chunks of ice.


The 175 cm Black Diamond Carbon Justice have become more then just my favorite backcountry skis, they are my favorite tools for moving around the mountains in winter. With widths of 138/111/123 mm and a weight of 8 lbs they are far from the lightest ski available, but for me they make up for their weight with the ease with which they break trail and ski difficult snow conditions and tight trees.


I bought my Justice on clearance last Spring and haven't skied my older skinier skis much since. The Justice excelled in the "Cascade Concrete" and  other variable snow conditions of spring in the Cascades including skiing from the crater rim of Mount Saint Helens. I've used them in numerous powder tours in the Montana Rockies since we moved. They have excelled in all soft snow conditions. While not a carving ski, they have also proven more then manageable in stiff wind slab and icy exit tracks.


We frequently do tours where the two of us are are taking turns breaking trail for miles on end. These are not the conditions under which speed records are set on skinny rando or xc gear. The width and rocker of the Justice helps it glide on top of the snow. Even trail breaking in the deepest snow of the season I could slide my skis along without lifting my feet; they just float up to the top of the snow.


Skiing down low angle powder is a joy. The Justice glide speedily and arc big turns through even the mellowest of meadows making it easy to find thrills without venturing onto the steeper more avalanche prone slopes. They make keeping up speed on long low angle exit skis easy.


I considered using my older skis in thin early season conditions but the added float of the Justice kept me further up out of the snow above most of the buried rocks and logs. They still had a hard year and hit enough things to scratch and scrape the bases in a number of places.  They held up well and I had no true core shots or collapsed edges. I have had some issues with the top sheet chipping and delaminating but nothing a bit of epoxy didn't fix.


The bases were a bit dry to start with and I had to be quite aggressive with waxing to keep them sliding on rough spring snow. They have been fine since I liberally coated the skis with wax and went over them multiple times with the iron over the course of a few days to ensure the wax soaked in deep.


The Justice are unbelievably fun in tight trees and buschwacky skiing. Even in heavy snow that would suck my skinny skies down and lock them into a straight line, the Justices pivot and smear on a dime.

When a chute opens up through the trees their lack of side cut and relative stiffness lets them confidently straight-line to the bottom where they can be turned into a full stop with a satisfying spray of snow. The spear like tip stabs through bumps with minimal deflection. Jumps, dropoffs and small pillows are enjoyable and easy to land even for a poor skier like me. I will never go back to a skinny ski for heavy and wet spring conditions.


I only skied the Justice in-bounds a couple of times last Spring. They are skiable on groomers but require a balanced approach with lots of skidding. For open runs and riding over cut up inbounds crud, the longer fatter 185 cm would be better. For my use (90% human powered backcountry skiing far from any ski lifts) the lighter weight and quick turning 175 cm makes more sense. For a primarily inbounds ski I would buy something stiffer with better edge hold.

BD is revamping their entire ski line with carbon and the Justice won't be coming back next year, so it is on clearance a number of places. If you buy a pair make sure you get the carbon version which has a green/white or orange/white honeycombed top sheet. The red topsheet version from older 2011 and earlier lacks carbon and is heavier and softer. Buying through the price comparison tool below will help support Hillmap.