Thursday, February 28, 2013

Sapphires: The other side of the valley


A view into the Sapphires

Here's a few photos of the Sapphire Mountains, the range on the East side of the Bitterroot Valley.

The cloud-covered Bitterroots from Chaffin Butte

We've been ignoring the Sapphires in this blog, and in truth, we've spent most of our time in the taller, snowier, granite-filled Bitterroots.  But the Sapphires are breathtaking and I spend quite a bit of time admiring the sagebrush foothills and forested peaks.

The trail to Chaffin Butte

These photos were taken on Chaffin Butte, a favorite local hike just outside of Corvallis.  The views from the top are expansive, and I felt like I was floating in air suspended between the peaks of both ranges.


Tuesday, February 26, 2013

Raft Valves and Dreams of Homemade Packrafts

Jen ponders the idea of a raft. 

A friend recently got me intrigued with the idea of packrafting trips in shallow desert rivers. I can't justify the cost of an Alpaca or BayLee but would like something more durable and capable then a StuapiNRSFlytePacker or cheap pool toy. Something that could be dragged through shallow sections, beached on gravel bars, floated down the occasional class II+ rapid and paddled through mellow water with lots of sharp sticks.

On a long drive Jen and I became intrigued with the idea of making our own packrafts. The mathematician in me couldn't resist trying to identify the simplest design that could create a functional inflated shape out of a 2d material with minimal simple seams to make home production easy. The math  governing inflation of stretchable materials is still intriguingly unsettled. My mind has been keeping me awake as it searches for en elegant solution on par with the catenary curves used to keep the fabric in ultralight tarp shelters taut. 

Since not many people make their own packrafts (or Inflatable Kayaks, Matresses, Donuts etc.) it is difficult to find components like lightweight valves. I've managed to locate some valves that suit my needs and some other options that might be better if you are aiming for something more ultralight or mouth inflatable. I've enumerated them below. 

Heat sealable nylon "test pillows" with reusable AIRE Summit 2 valves.

White Water Valves

NRS and other white water specialty shops stock an assortment of two piece valves for white water rafts and kayaks. The stand outs in this category are the Leafield, Halkey Roberts and Aire Tributary Summit valves. These are all two piece valves with a threaded plunger assembly that screws through a hole in the fabric into a receptacle inside the tube as shown in this Video from NRS.


These valves are heavier then some of the other options but have a number of advantages:
  • Widely available in white water shops. 
  • Installable without glue.
  • Reusable for destructive prototype testing.
  • Proven design with a one way plunger valve for easy filling.
  • Availability of adaptors that can be used to make inflation bags, blow tubes etc.
Notably the Feathercraft Baylee packrafts appear  to use this sort of valve.

Partially Installed AIRE Summit 2 valve in a test pillow. 

For my material testing and prototyping I chose to purchase two Summit 2 Valve's for AIRE Tributary along with Adaptors and Vinyl tubbing to use them with a pump and eventually make an inflation bag and mouth tube that fit into the main valve. This valve appears to be one of the smaller and lighter whitewater valves available and is also one of the cheapest at $9/valve. It lacks a rubber gasket between the two sections and I've noticed some slow leaks against the rough surface of the thin fabric. For production I may use a double layer of fabric, a thin coat of Aquaseal or a gasket made from Silicone Rubber to ensure a good seal.

Home Made Mouth Inflation Tube 

As part of his excellent site on building inflatable and folding sea kayaks Tom Yost has instructions for making a flotation bag including a mouth inflation tube made from PVC pipe fittings, Vinyl tubing and a NRS Float Bag Valve.

Mr. Yost's site is a wealth of other information as well though he uses mostly vinyl materials for his kayaks. Packrafts tend to be made from urethane coated fabrics which allow for a more durable, flexible and lightweight construction and release fewer known toxins during production.  

Carmo Modular Valve System and Fittings

Image from carmo.dk
Danish manufacture Carmo makes a line of urethane glue/welding compatible flanges, fittings and valves. These appear to be the valves and elbow jointed blow tubes used by Alpaca for their well regarded pack rafts. The site states that small quantities are available in both PVC and Urethane compatible materials but they must be ordered and shipped from Denmark. Some of the items of interest for DIY projects include:

I may order some of these components to reduce weight once I have a prototype I am happy with but for now the reusability of the Aire valves is nice.

Pool toy/Cheap Raft/Boston Valves


I initially thought these would be one of cheapest and easiest options options and indeed the FlyWeight FlytePacker and NRS PackRaft use Boston style valve that are rumored to be  compatible with Exped Sleeping Mat Inflation Accessories.

They are unfortunately difficult to source unless you have an old raft to cannibalize. Many places offer replacement boston valves but these don't include the flange to glue into the raft.

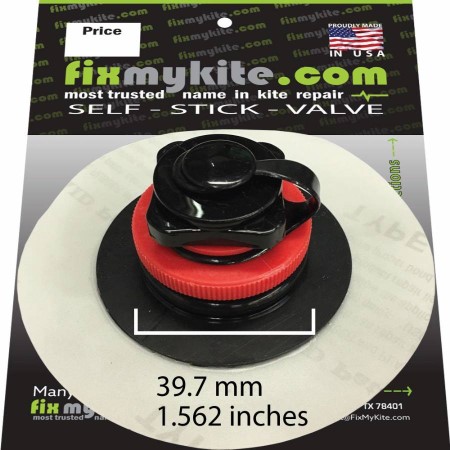
The only source I've found for the entire valve including flange is from suppliers of Power Kiting equipment where an inflatable bladder is used to give a kite rigidity and allow it to be launched from the water. FixMyKite.com has a selection of stick on valves and fittings available though it is unclear if the stick on portion could be cut off and if the flange could be used with urethane glue. These valves are also more expensive then the Aire valve I purchased from NRS but they do offer both boston and the simpler clear valves used on pool toys which might be nice for seats etc.

Next: The Fabric

The final design for my raft will be determined in part by the materials I can source. I'm happy with the Aire valves for now so the next step is to identify a usable fabric and determine what types of seams can be easily made airtight at home. As mentioned above most modern packrafts are made from urethane coated nylon which allows a durable, flexible and light weight construction   

My initial experimentation was done with some military surplus heat sealable packcloth and a sealing iron and rubber roller. This setup has proven extremely temperamental to work with. The fabric has a thin urethane coating on one side and is only sealable coated side to coated side, limiting the designs you can make.  This coating is also quite fragile and my test pillows frequently start leaking around the edge of seams where some combination of the heat of the iron and stress in the fabric would cause the coating to degrade.

Further, the seams aren't particularly strong and can easily be pealed apart by hand starting from one of the corners. The uncoated side of the fabric is also prone to wetting out through prolonged exposure to water.


In search of a better method and inspired by the heat welding used in the video above, I used a cheap digital heat gun and rubber roller to hot air weld some small samples of urethane coated "Traveler" and "Ballistics"cloth from Seattle Fabrics. This fabric is not sold as being "heat sealable" with an iron but using a method similar to the one in the video below I was able to produce a very robust seam.


Despite its small area this hot air welded seam can not be pulled apart by hand. It is also very resistant to peeling if one works to pull up one of the "lobes" left by the shaped edge of the sample piece.

Unfortunately this fabric is also only coated on one side and is even more air permeable than the heat sealable fabric. I think the ideal fabric for home tube construction with this method would be a nylon fabric in the 200-500 denier range with a thickish urethane coating on both sides. A thicker 700-1000 denier double coated fabric would be nice for the floor. Such fabric is available in large quantities from custom manufactures but I've been unable to find it in small quantities.

I'm also looking into adding my own coating using either liquid urethane raft sealant (see Dave Chenault's report on this) or a paint on coating used to waterproof nylon skin-on-frame sea kayaks or recoat whitewater rafts. These products could be applied either after construction or, if the result is hot air weldable, after cutting but prior to assembly.

PVC coated fabric is another option but it is heavier and releases more toxic fumes during heat welding.

If you've found a source for urethane coated fabric or another source for inflatable valves or glue in flanges let me know by posting in the comments below.

This post is part of a series you can see all the posts under the Homemade Packraft Tag.


Thursday, February 21, 2013

Fixing the Fire Maple FMS-118 Inverted Canister Sputter


The Fire Maple Fms-118 is a nice looking and cheap stove which, on first look, seems to be a good option for winter use with an inverted canister. My testing revealed a sputter issue when inverting the canister for cold weather use, which the I posted about earlier, but I think i've found a fix.

Following some advice from user Stuart R in this thread on backpackinglight.com I worked a bit of wire into the preheat tube to reduce it's ratio of internal volume to surface area. This proved to be a non trivial operation thanks to the sharp bends in the tube, but I found something that worked and the supplies I used and steps I took are below.

I haven't had a chance to test this extensively in cold ambient temps but the mod eliminates the sputter when tested with a canister fresh from our freezer. The Fire Maple now seems almost as sputter resistant as the MSR WindPro II, though the Windpro stove still gets my vote in the "Designers Clearly Knew Their Stuff" Category.

I'll do some more testing with the Firemaple next time we get temps bellow 20 F at the house but the Windpro is the stove we will take into the mountains when we expect it to get that cold. 

Supplies


  • A selection of stranded copper wire to make sure you find a size strand that works.
  • Wire strippers. 
  • Small pair of long nose pliers. I used the one from this Crafstman set from amazon.
  • Yellow Thread Seal Tape (yellow is for use with gas lines).
  • Small crescent wrench.
  • Wire cutters and scissors. 

Steps

  1. Strip six inches of wire and cut off one six inch long strand. Save the other strands incase you mess up and bend the first one.
  2. Remove the fuel line fitting from the burner assembly. I actually disassembled the entire stove but this is unnecessary.
  3. Begin feeding the strand into the pre heat tube. It will be stopped by the bend almost immediately.
  4. Using the long nose pliers grasp the wire as far inside of the burner assembly as you can and push it into the preheat tube. Be methodical and only feed in about 1/8-1/4" at time. Any more and the wire might bend instead of pushing into the tube. Once a wire bends it is difficult to keep feeding it.
  5. Feed wire until you can't any more. I fed enough wire into the preheat tube to reach just past the upper bend before I bent the wire and was unable to continue. 
  6. Cut off the excess wire leaving enough to pull the wire out if necessary but not enough to reach past the metal fitting on the end of the fuel line as the wire could get hot enough to melt the plastic inside the fuel tube.
  7. Cut a narrow strip of thread seal tape and wrap the threaded fitting on the end of the fuel line.
  8. Slide the fuel line fitting over the wire and reinstall it into the burner assembly.


Monday, February 18, 2013

Sunshine on Snow


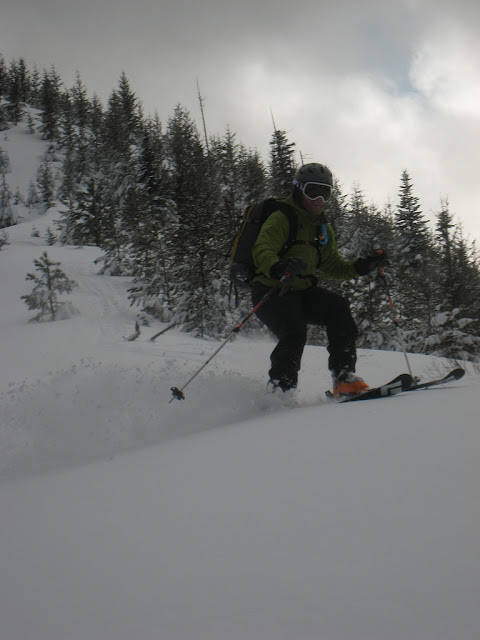
Coming from the Cascades we continue to be amazed at the number of days we end up skiing powder in the sun here in the Northern Rockies. Here are a few shots from our Presidents Day tour. We've been playing with using the s100's high speed burst (one of the "scn" modes) for action shots.


Wednesday, February 13, 2013

Print a free topo map from high quality map layers

With a map in hand I feel like I can go anywhere

How to print a free topo map

Picture this: it is midnight on Friday and your weekend plans changed, freeing you up for a two-day backpacking trip.  Do you wait until the stores open on Saturday to go buy a map and get a late start?  Do you head out into the backcountry without a map?  Do you quickly print a map from your computer?

Create and print a map in a few minutes using hillmap.com and enjoy your trip.  Fast and easy logistics planning. Hillmap lets you print high resolution topo maps that include a scale, slope tool and magnetic declination. It makes an excellent replacement for proprietary tools like TOPO! from National Geographic.

Step 1: Create a map

Use the tools in hillmap.com to create and customize your map.  Choose the map layer that provides the best information for your trip.  Most often I choose the CalTopo USGS or CalTopo FS (which only covers Forest Service land) map layers because of their high resolution, but you can also choose other USGS scans, Google Maps, and others.  You can use the tools under the Path tab to plot your route, or print a clean topo map of the area.


Step 2: Press Print

Press the printer icon in the upper right hand corner, or navigate to Print under the Tools tab.  

This image is from the beta site

Step 3: Set up specs in the Print dialogue box (most of it is set up for you)

Hillmap has default print settings that will print your map on 8x10 paper.  It will automatically print a map with the same layers as the map on the left side of your screen.

To change your paper size, pick the paper size from the drop down list and hillmap will automatically fill in the correct values above.

Red Circle: Drop down menu where you can choose which map layer you will print
Green Circle: Paper size drop down menu, pick the size of your paper (8x10 is the right size for most printers)
Purple Circle: Where you enter how much you want the printer to scale your map
Yellow Circle: Click the "Open Printable Map" button to create a map you can print from your internet browser
(This is the print dialogue box from the hillmap beta site)

You can change the map layer that is printed in the print dialogue box by clicking on the Map Type drop down list.  If you change the map type, it will still print the same area selected on screen.

Step 4: Direct your printer to scale the map

To ensure a high-quality map image on one piece of paper, make sure to have your printer scale the image!  If you do not scale the image, you could end up with multiple pages of low-quality image.

To scale the image, you need to check both the hillmap print dialogue and your own printer dialogue.  First, make sure the correct value is entered in the hillmap print dialogue (see photo above).

This is the system dialogue print screen for the Chrome internet browser.  Enter your scale percent in the field marked "scale" circled in red.

We find that scaling your image by 25% works well.  If it does not work for you, you may need to play around with this value.

After you have finished in the Hillmap print dialogue box, press Print at the bottom of the box (If you are in the beta site, press the button called Open Printable Map).  Hillmap will generate your map image, this will take a few minutes.  The image will appear in your web browser when it is finished loading.  Check the map image and make sure it captures what you're looking for prior to printing.

Use your browser print function to print the map.

When your print dialogue box pops up, be sure to scale the image by the same value entered in the hillmap dialogue box.  This will not happen automatically, you must manually change the scale value.

Optional: Troubleshooting Print Scale

If your operating systems and browser won't let you scale the print page you can use a browser plugin to take a screen shot of the entire page and print that to fit on the page. We recommend Screen Capture (by Google) for Google Chrome.

Paper

You can print on any paper that works with your printer.  My favorite map paper is iGage Weatherproof Paper. This is a synthetic waterproof paper that can take a beating and stay intact.  I think this is important especially on multi-day trips, when you want to reuse your map or when you may encounter rain or snow.  Our printer takes the 13x19 size, which allows for a bigger map.  It is also recyclable.

Zoom

How far you are zoomed in on the map when you press print makes a huge difference in the printed map as hillmap will fit the visible area into the printed page. Zoom in for finer detail, zoom out to see more terrain.  I tend to like my maps zoomed in quite a bit because I think the finer detail helps with navigation.  Ryan tends to like his maps zoomed out so that when we reach a viewpoint he can identify the surrounding peaks.  Sometimes we print two maps for the same trip on oposite side of one piece of paper.

Use the zoom function on hillmap on the left side of your screen.  You can check the level of detail after hillmap has generated your map in your browser (this is after you have hit print in hillmap, and before you hit print for your browser).

Zoomed out

Zoomed in


Wednesday, February 6, 2013

Bouldering in winter at Larrabee State Park

January bouldering at the beach

We are back in Seattle this week, and I am remembering everything I love about Western Washington.  Sunny, warm bouldering at Larrabee Park during the winter is one of those things.


Soft sandstone formations line the beach, creating really interesting shapes to traverse and a few fun harder problems.  The cliffs face West, catching and holding the sun, and the sunsets over the water are magnificent.


Larrabee is just outside of Bellhingham, and in a bit of a rainshadow, so it is sometimes dry when it is raining in Seattle.


Park at the main parking lot for Larrabee State Park, and take the trail that leaves closest to the entrance of the parking lot (it is across the street from the lot).  Head downhill and across the railroad tracks, and take one of the smaller trails that head down to the beach.  Getting down to the beach is a bit of a scramble in places.  Walk along the beach until you see a place to climb.  The one thing to watch out for here is the tide coming in...we have waded out more than once.  You can also scramble up the steep bank to the railroad track in a few places if you get stuck.


This photo and the one below were taken in summer, not in January as were the rest.  I also like heading to Larrabee when it is hot, to keep cool in the breeze off the Sound and take a dip in the water.


Tuesday, February 5, 2013

Best snowshoe route and low angle ski tour near Seattle

Ryan measuring slope to scope a safe line

If you're looking for a great snowshoe trip or ski tour near Seattle, check out Road 800 at Blewett Pass in Eastern WA.  Big views, scenic tour, low angle and potential for route variation: you can stay on the road or easily head up on the ridge.

Ryan and I toured up Road 800 when we were first learning to ski.  We saw a trip report, checked it out on hillmap.com and saw that the tour had what we were looking for: an easy ski with a beautiful ridge, alpine terrain, easy parking and most of the terrain is less avalanche prone (although there are some drainages and road cuts that could slide...so this is not a tour for people who don't know how to stay safe in avalanche terrain.)


The map above shows the route along Road 800 to the top of a peak at 4885'.  You can click and drag on the map to see the beginning of the trail.  View the map in hillmap.com to see the route on a USGS map, or use the Caltopo slope feature to see the steepness of the slopes.

The views are stunning: the jagged peaks of the Stuart Range to the South and North to the peaks and hills that roll into Wenatchee.  Our trip was on an overcast day, however, we did have a peek of blue sky and distant mountains.

Below is a screen shot of the route with steep slopes (greater than 30 degrees) highlighted in red.  You can do this analysis using the hillmap.com slope tool analysis, under the Overlays tab.


Skiing Road 800

How to get there

Drive Highway 97 and park at the Sno-Park just West of the Pass (on the North side of the Highway).  You need a Sno-Park permit to park here.  

The route

Ski or snowshoe up Forest Service Road 7324, and take the spur road 800 left.

This is a popular area, and the road can get slippery and icy in places at the beginning of the trip.  But, road 800 is in a non-motorized vehicle area, so while you may hear snowmobiles, you won't have to breathe their exhaust once you reach the spur.

The road climbs quickly, and in a little less than a mile you will come out on a gently sloped road that traverses the North side of the ridge.  Ski or snowshoe out the ridge as far as you want.  We skied the road until we saw a gorgeous ridge to head up for some fun turns and more views.

Feeling alpine up on the ridge

You can tailor the trip to suit your level of skill and adventurousness by skiing either the road or the ridge line.  We found great snow, and the ridge gave us a truly alpine feel on a day that avalanche danger was high around the state and prevented us finding steeper terrain.  We met one other party out on the road. 

Ryan and I learned about this trip from the Wenatchee Outdoors Blog...a great resource for skiers and other outdoor enthusiasts in Eastern WA.


Ryan digging a snow pit to test snow conditions and avalanche potential
This information does not guarantee that this is a safe trip for you, or that you will find safe conditions during your trip.  Your safety is your own responsibility.  Stay safe, and have fun out there!